Status 09/2010
5.2
Tiles
a)
Parallel
installation
A parallel with the main front of the room is
determined before installation, using a guide line.
The distance from the wall is a multiple of the tile
size
less
approximately
1
cm.
In
halls
this
measurement can also be taken from the deepest
door threshold rather than the wall.
The starting
point is marked on the line determined.
Parallel/chessboard-style installation of tiles
This starting point is determined so that at points
which are particularly visible, for example the main
entrance, only virtually whole tiles are laid and no
narrow strips are used.
Proceeding from the starting
point, a row of tiles is now placed loosely along the
guide line and weighed down with stacks or boxes of
tiles.
In large rooms this row of tiles is left in position until
the adjacent field has been laid. In small rooms it is
sufficient to leave one tile as a reference.
b)
Diagonal
installation
The room is first divided up symmetrically and the
axis determined using a guide line. Now determine
how the tiles are to run to the walls and the main
entrance.
The diagonal of a square tile is the length
of the side of the tile x 1.4. If small triangles now
result here, the room axis is shifted sideways by a
fourth of the diagonal. The same applies to the
starting point. In asymmetrical rooms, a guide line is
used to determine the parallel at a distance from the
main front, which corresponds to a multiple of the
tile diagonal less approx. 1 cm. Here too, it should
be taken into account that only virtually whole tiles
should be positioned at the main entrance and,
between them, half-tiles, never small triangles. A
double row of tiles is then placed loosely along the
guide line, the first row of tiles lying with opposite
corners along the guide line and the corners of the
second row of tiles touching it.
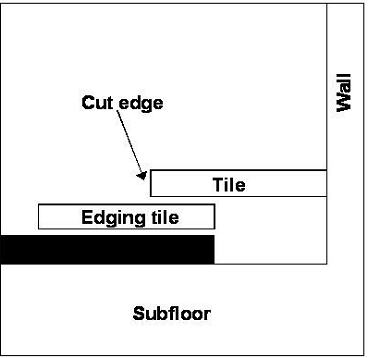
Cut edge of edging tiles
In large rooms a diagonal row of tiles is now laid
from the starting point outwards and used as the
baseline for laying.
In small rooms it is sufficient to
leave one tile as a reference.
The edging tiles are
cut in using a hook blade or utility knife after the
surface has been bonded.
6
Bonding
Bonding must always be carried out over the entire
surface. Always follow the instructions of the
adhesive manufacturer during the process.
For the
back of the floor covering to be wetted, it is essential
to select the correct notch spacing, change trowel
blades
in
good
time
and
rub
thoroughly.
Continuously check that the back is wetted by
pulling up tiles as you work.
6.1
Rolls (sheet flooring)
The rolls are pushed back to the centre of the room.
Bonding begins with the centre roll.
The adhesive for
the second run half must reach exactly to the
adhesive border of the first run half. Run halves that
are cut to closely fit adjoining room fitments such as
door thresholds and frames must be bonded first.
The rolls are pushed into the bed of adhesive taking
account of the curing/open time of the adhesive (see
manufacturer's
instructions)
No
air
should
be
trapped in this process.
Hollow raised areas can be
found by knocking and remedied by stroking the
trapped air outwards.
The head ends are rolled in
(bent towards one another). If required, seams and
head ends should be weighted until they are held to
the floor by the adhesive.